Ask your assistant about attention
ATTEX is also an MCP server: a connection your AI assistant can use to ask our data questions directly. You add it once and then ask in your own words: which apps carried the most ad impressions in Sweden last month, how attention differs between feed and reels, which creatives of a brand were looked at most. Your assistant gets aggregate numbers only, never an individual impression or person.
You need one thing: your connection address. It is a long web address that works as your personal key to ATTEX. You do not open it. You copy it and paste it into your assistant, in the steps below.
Your connection address is not shown yet. Open this page with the Connect your assistant button in your invitation mail, and it appears here.Click Copy address, then follow the steps for your assistant. The address stays in view while you scroll. It is yours alone: there is no password and nothing else to type, and ATTEX mails you a short notice each time it connects an assistant. ATTEX invites the people on your account; if you have no invitation, write to data@attexdata.ai.
On a Claude Team or Enterprise plan, or where your organisation does not let you add connectors yourself, read One connection for a whole organisation first. In Microsoft Copilot you do not need the address at all: your IT installs ATTEX as a plugin, and you sign in with a code.
Choose your assistant.
Claude
-
Open Claude's Add custom connector form. If the link lands somewhere else, open Customize in the sidebar, Connectors, and choose Add custom connector in the Add menu.
-
Name it ATTEX, paste your connection address as the MCP server URL and click Continue.
Your connection addressYour connection address appears here when you open this page from your invitation mail.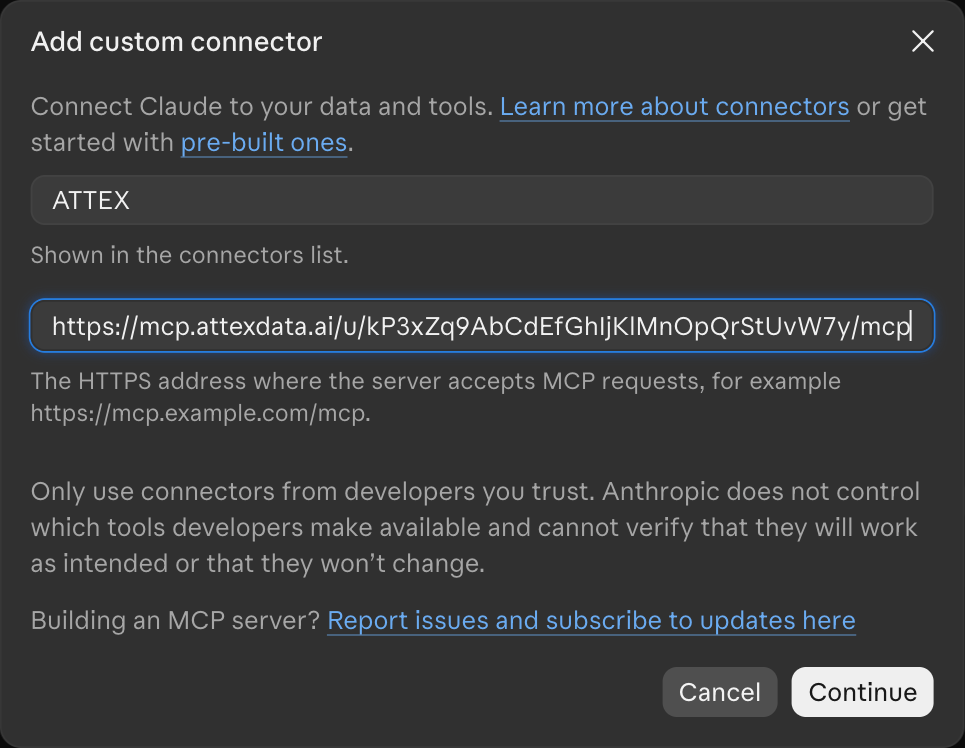
-
Claude checks the server and detects the sign-in settings on its own. Leave them as they are and click Add.
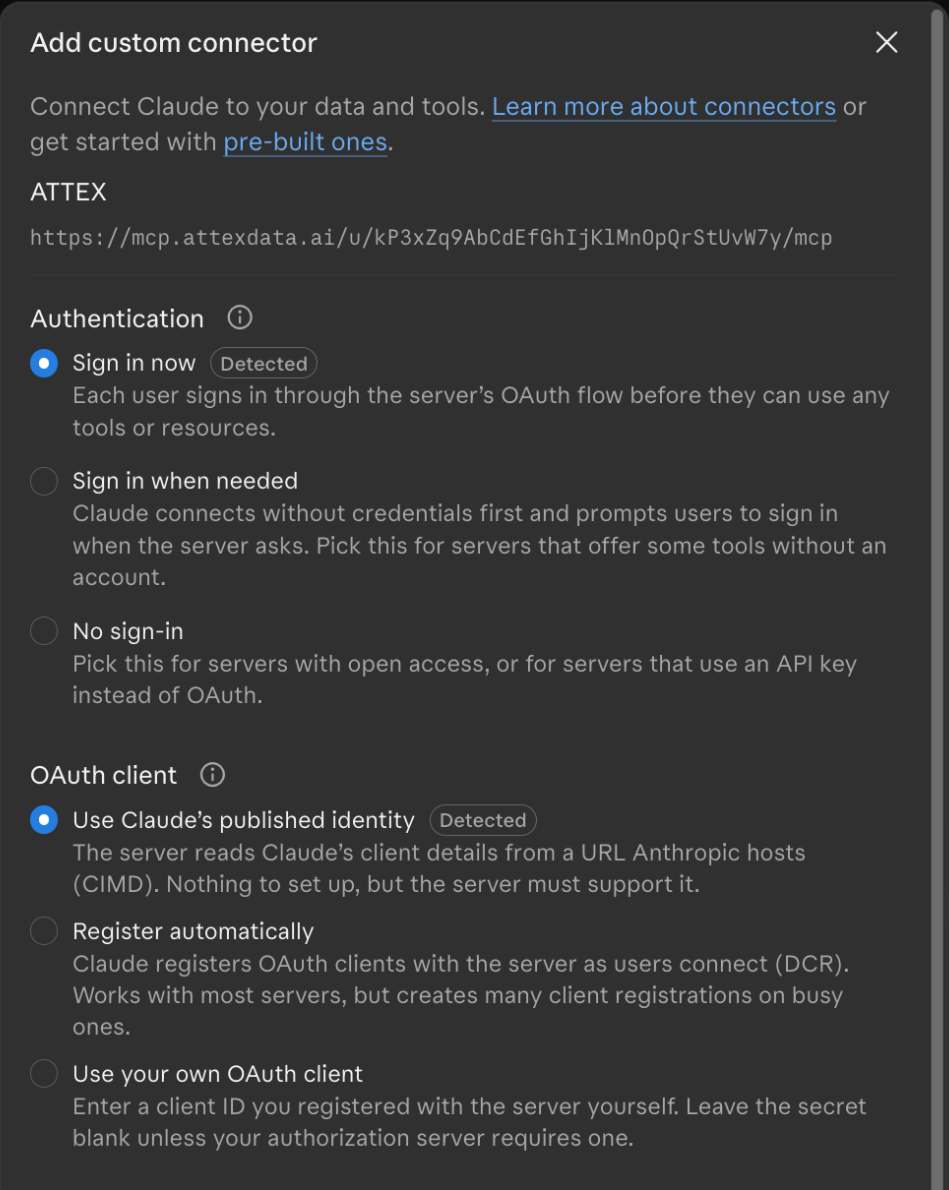
-
Click Connect. You stay in Claude, and a moment later the page says Connected.
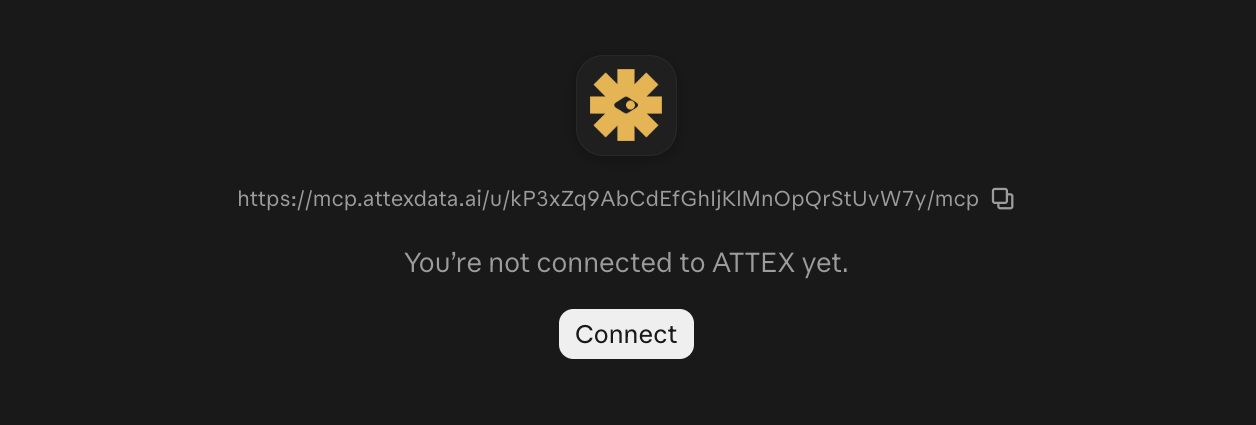
-
Set Tool permissions to Always allow: the tools only read aggregate numbers, so there is nothing to approve one call at a time.
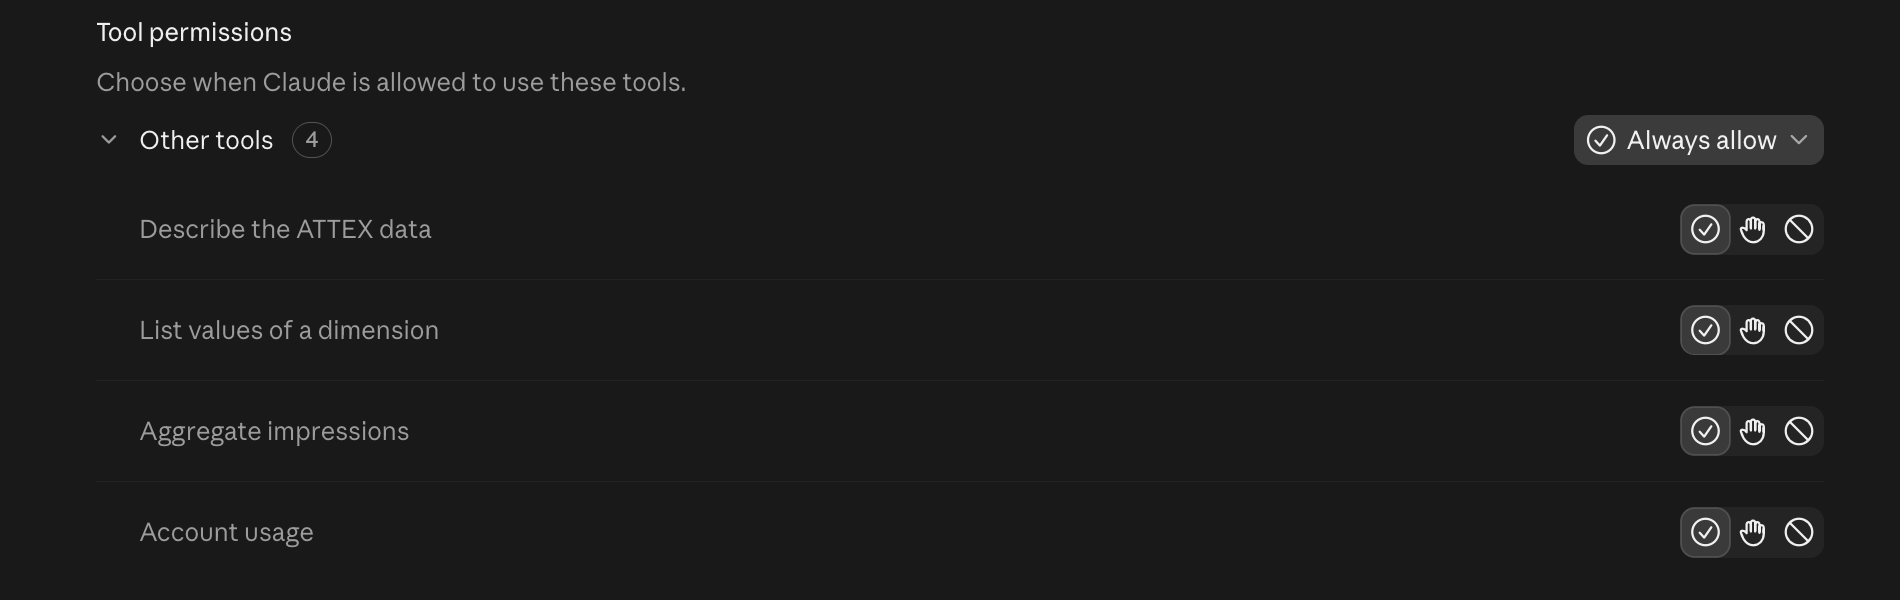
-
Add and connect ATTEX on claude.ai in your web browser, signed in to the same Claude account as the app, with the steps under On the web.
-
Restart the Claude desktop app. ATTEX is then listed as connected under Customize, Connectors, and you can ask it from the app.
Connecting from inside the desktop app did not complete when we tested it. The Customize page and the form are the same as on the web, but Connect ended like this:
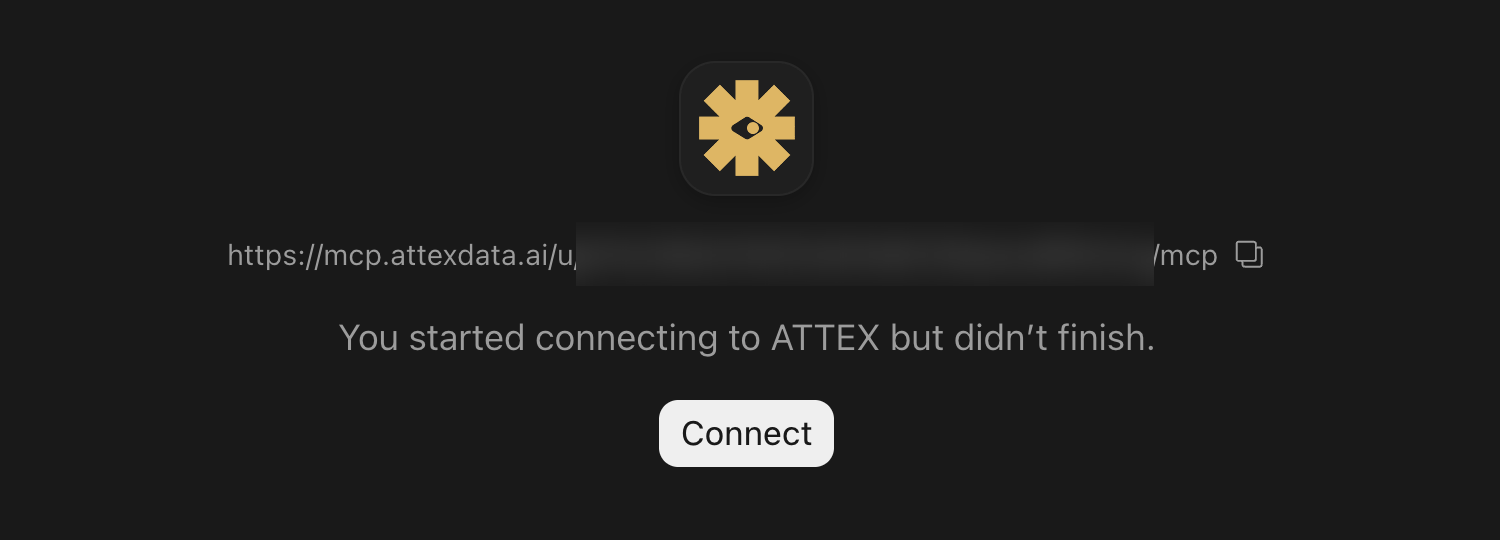
If you see that, nothing is wrong with your address. Connect on claude.ai in the browser and restart the app.
Once connected, ATTEX stays on for new chats; just ask. The + menu in a chat lists the connectors you can turn off for that conversation.
Claude Code
One command in the terminal with your connection address in place of the last word, then /mcp inside a session connects it:
claude mcp add --transport http attex YOUR-CONNECTION-ADDRESSChatGPT
-
Custom connections need Developer mode, which is off by default. Open your profile, Settings, Security and login, and turn Developer mode on. In a Business or Enterprise workspace only an administrator can do this; ask them, or use a personal account meanwhile.
-
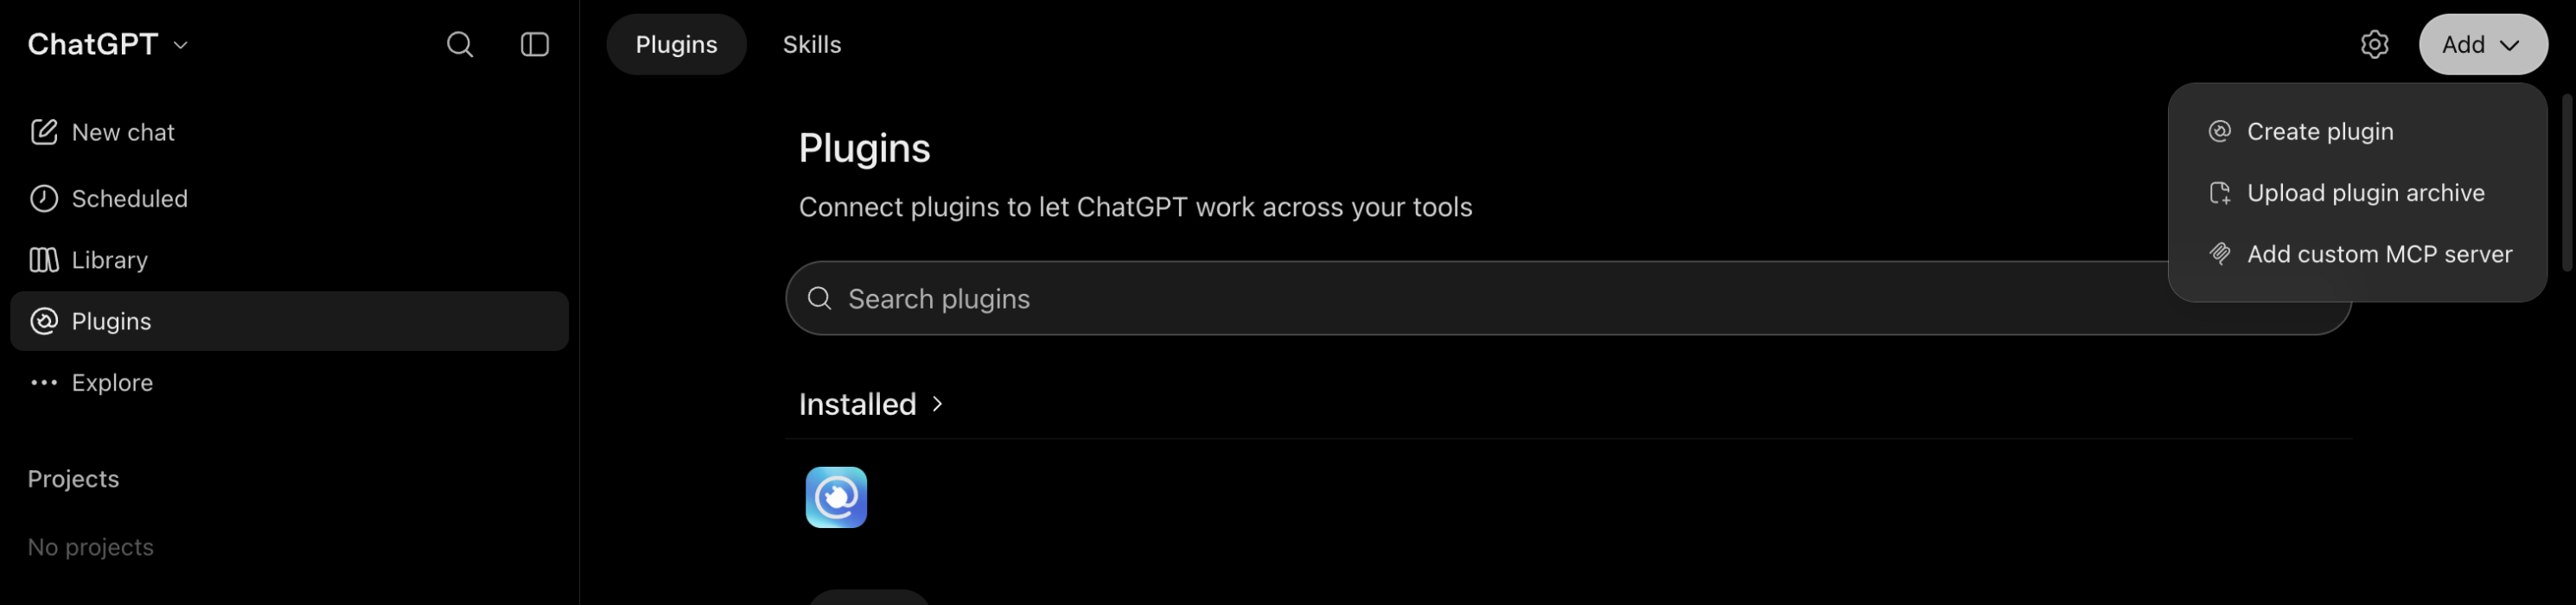
Open Plugins in the sidebar and choose Add custom MCP server in the Add menu at the top right.
-
Name it ATTEX, paste your connection address as the server URL, leave the authentication on OAuth, tick that you understand the risk notice, and click Create as a plugin.
Your connection addressYour connection address appears here when you open this page from your invitation mail.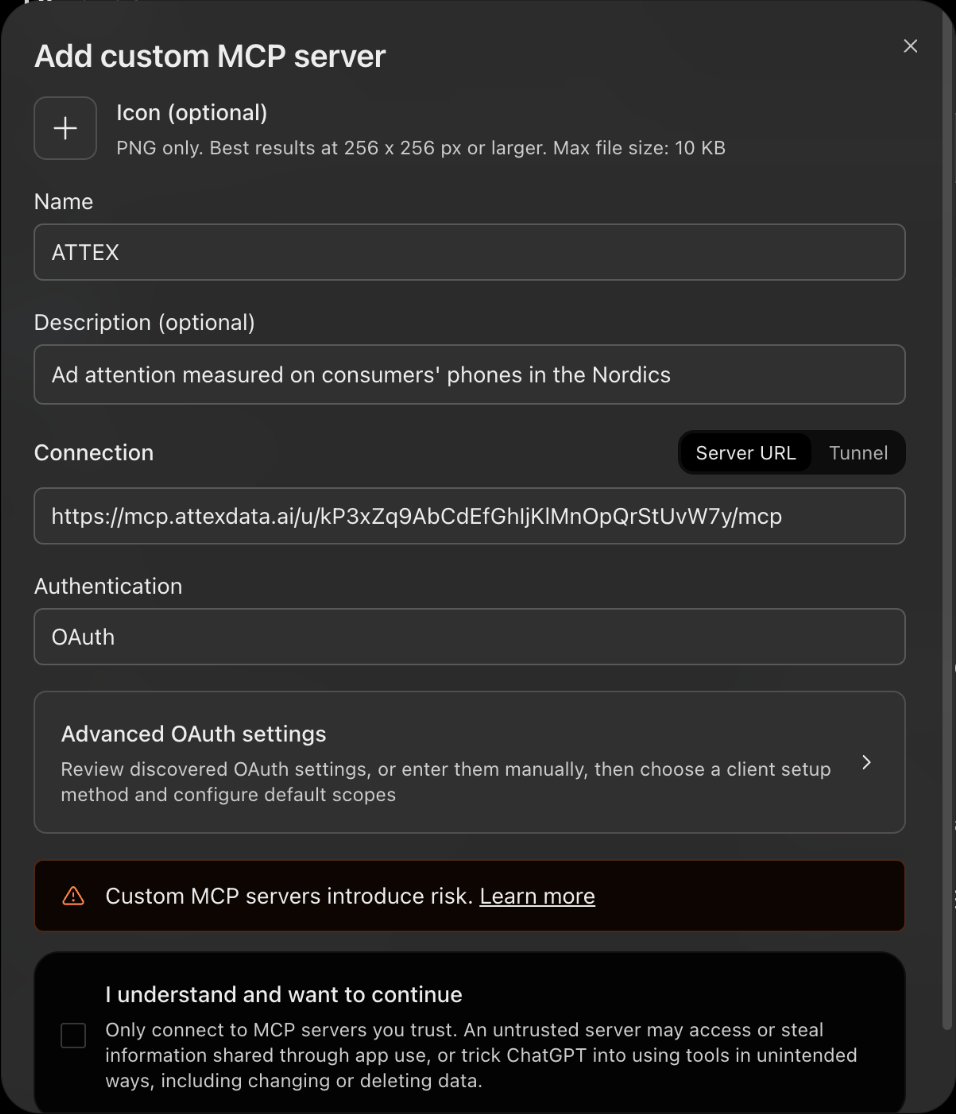
-
ChatGPT asks to connect ATTEX. Click Connect ATTEX: a browser tab opens for a moment and brings you straight back, and ChatGPT lists ATTEX under Installed.
-
ChatGPT does not use a plugin on its own: in a chat, click Plugins under the message box and pick ATTEX, or write
@ATTEXin your message. A Project with ATTEX in its instructions keeps that choice for every chat in it.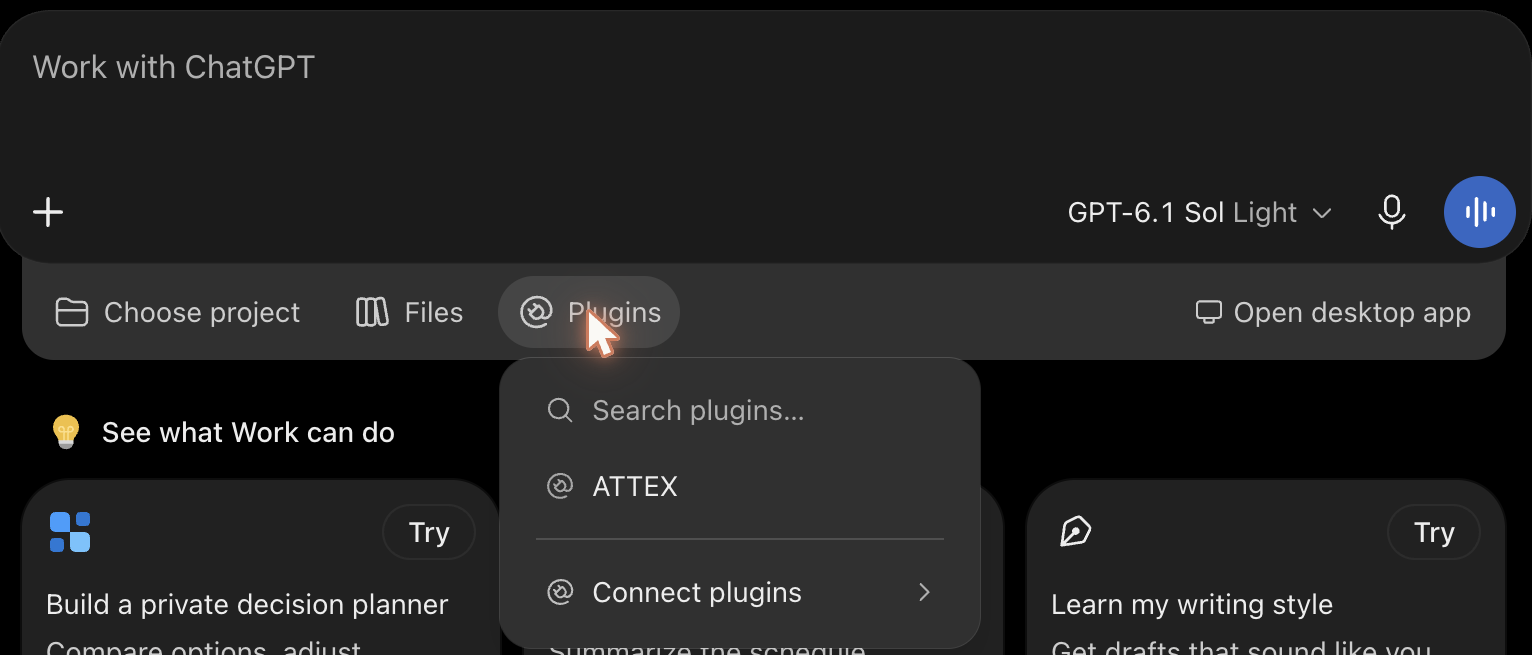
The desktop app needs no Developer mode, and its form looks different from the web.
-
Open Plugins in the app and choose Add MCP server in the Add menu at the top right.
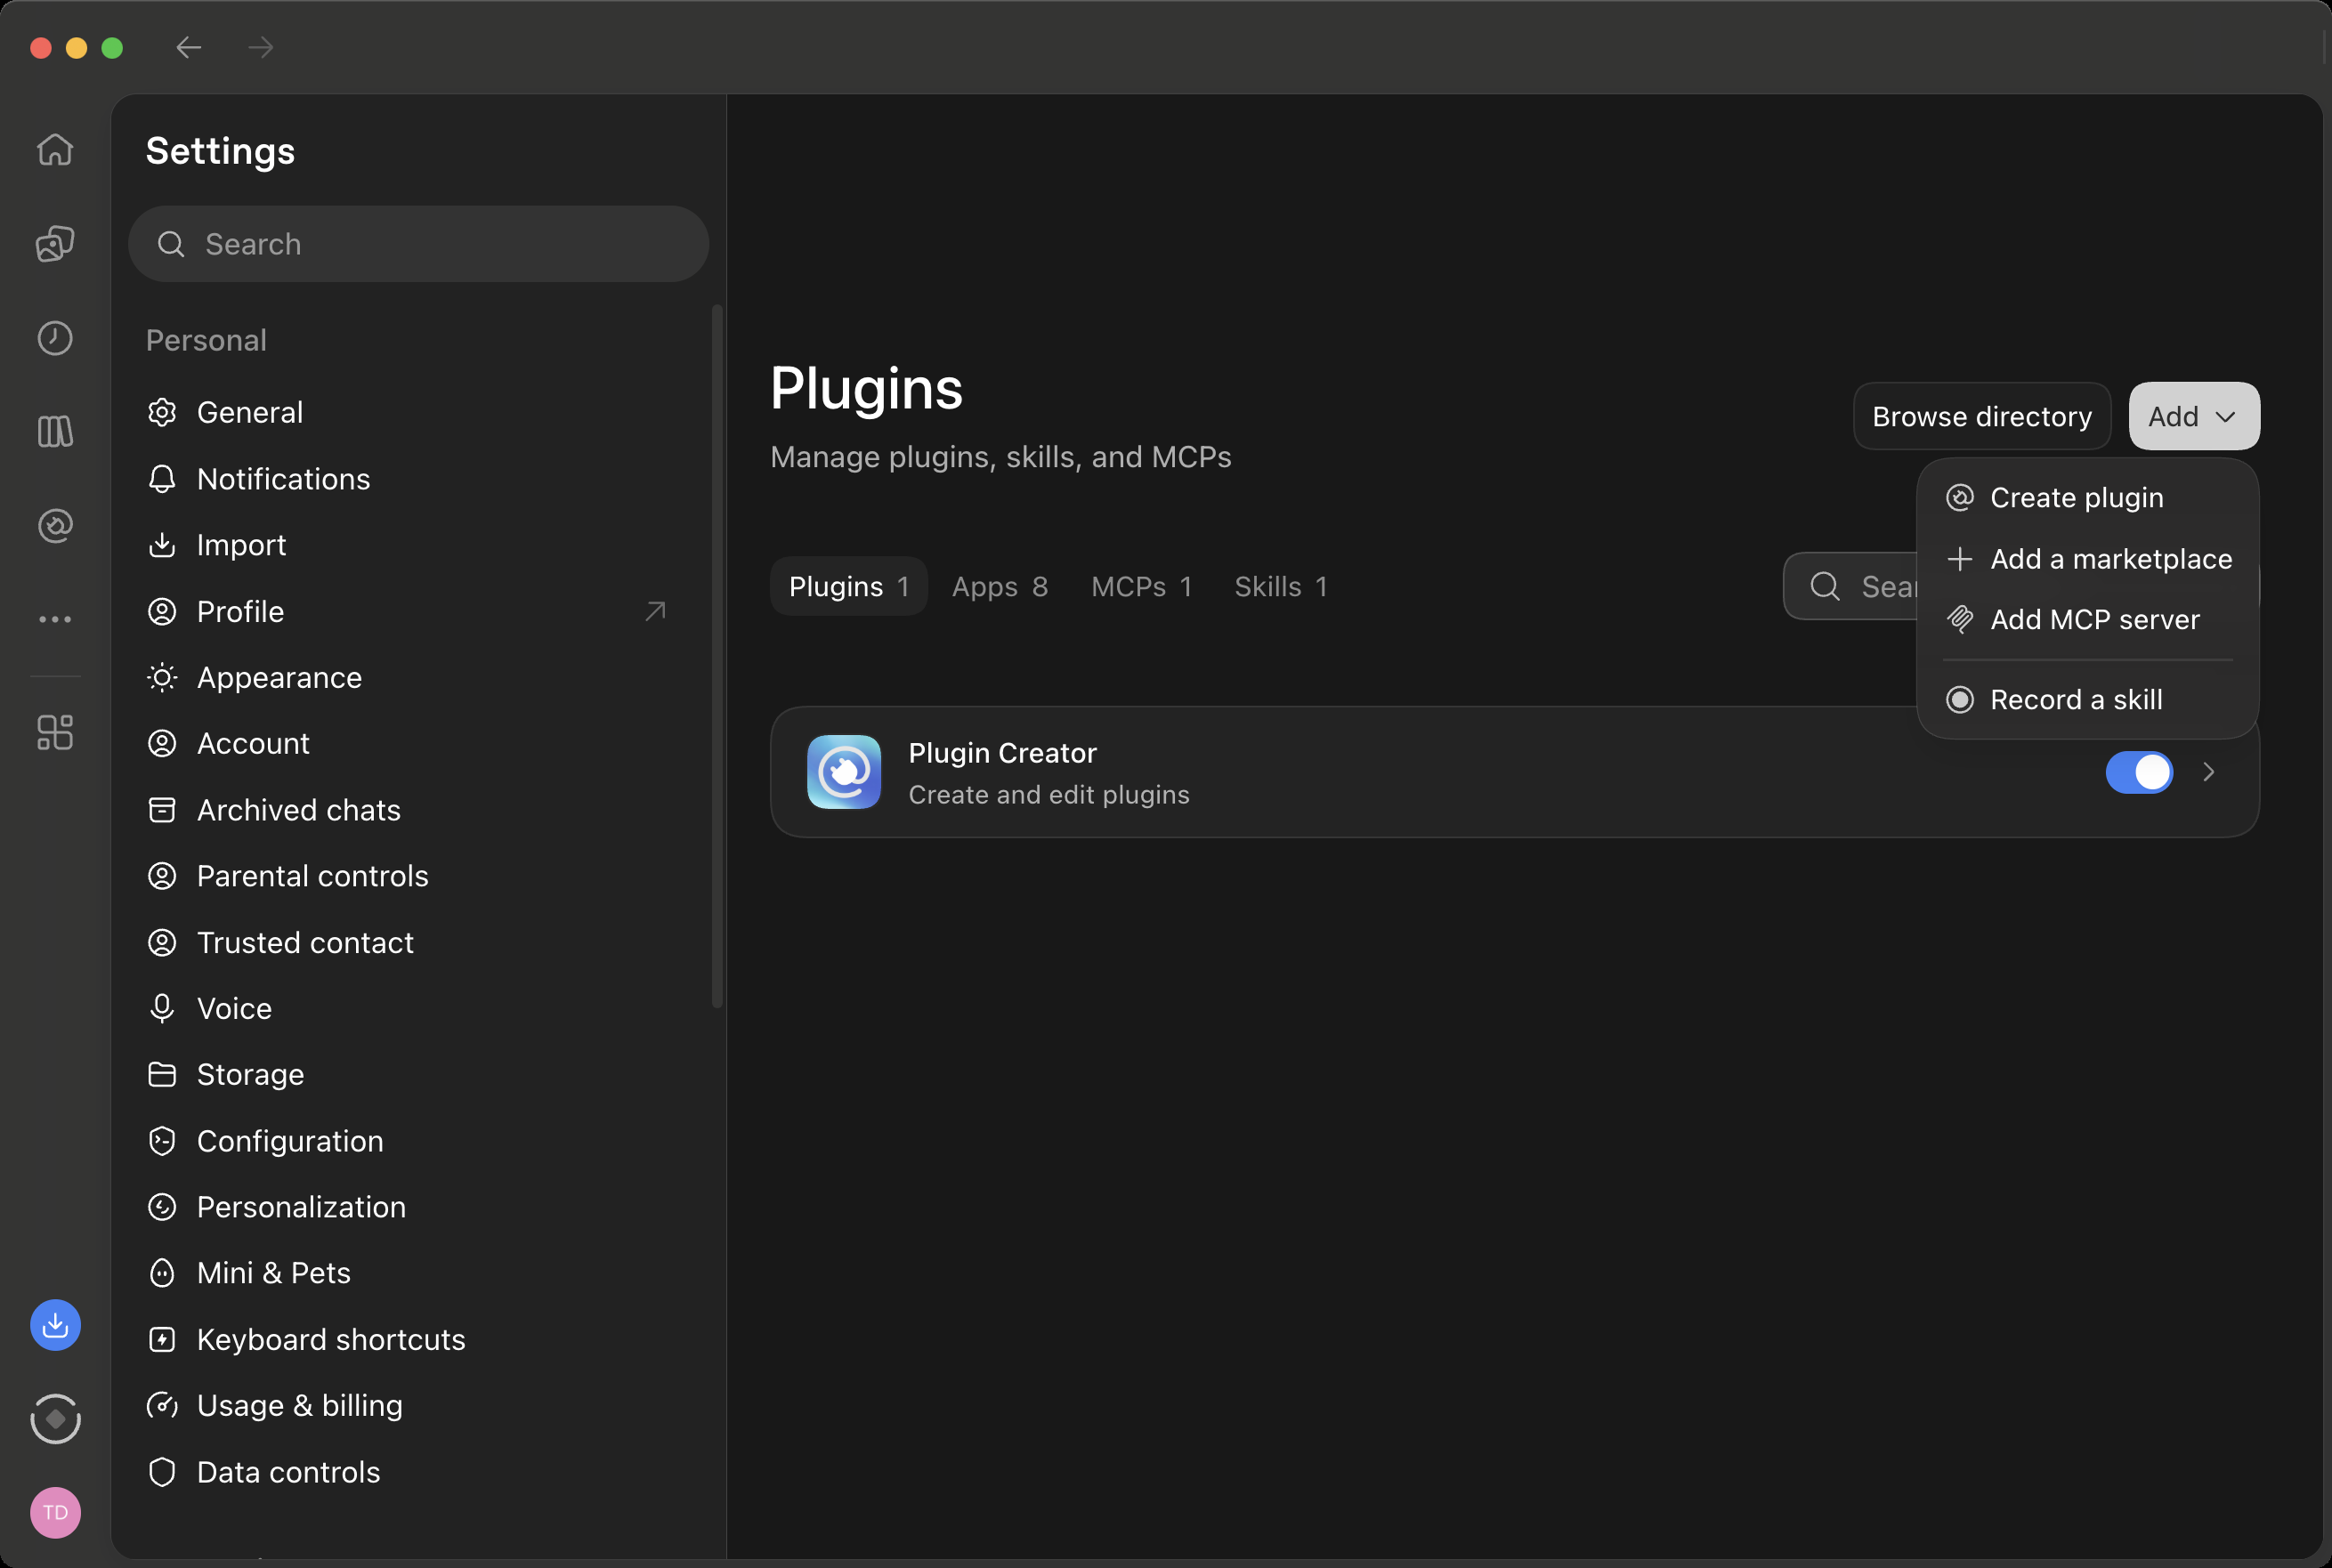
-
The form is titled "Connect to a custom MCP". Type ATTEX as the name and switch Type from STDIO to Streamable HTTP: the fields for a command go away and a URL field appears. Paste your connection address as the URL, leave the other fields empty, and click Save.
Your connection addressYour connection address appears here when you open this page from your invitation mail.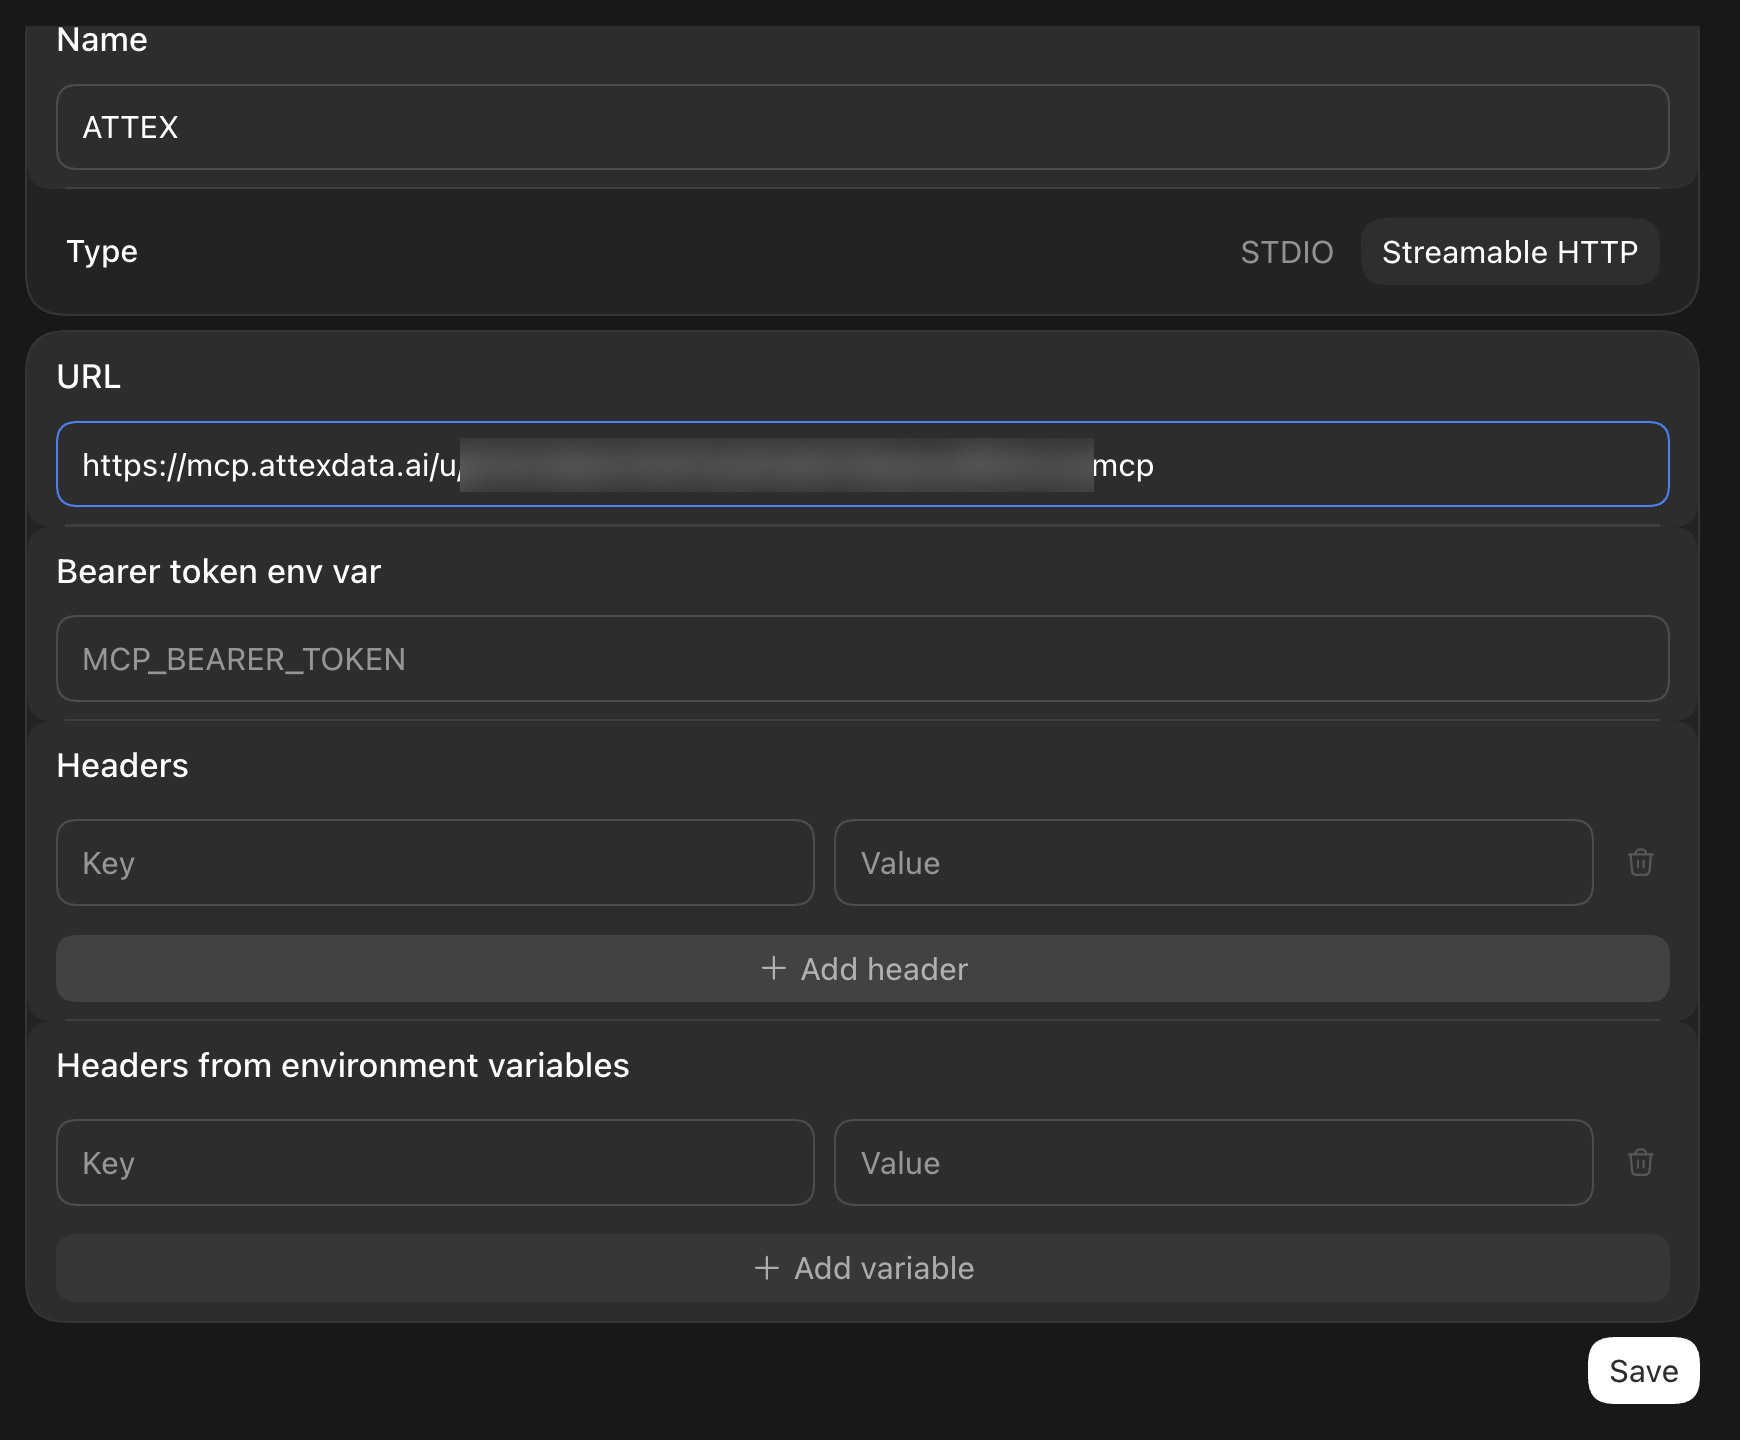
-
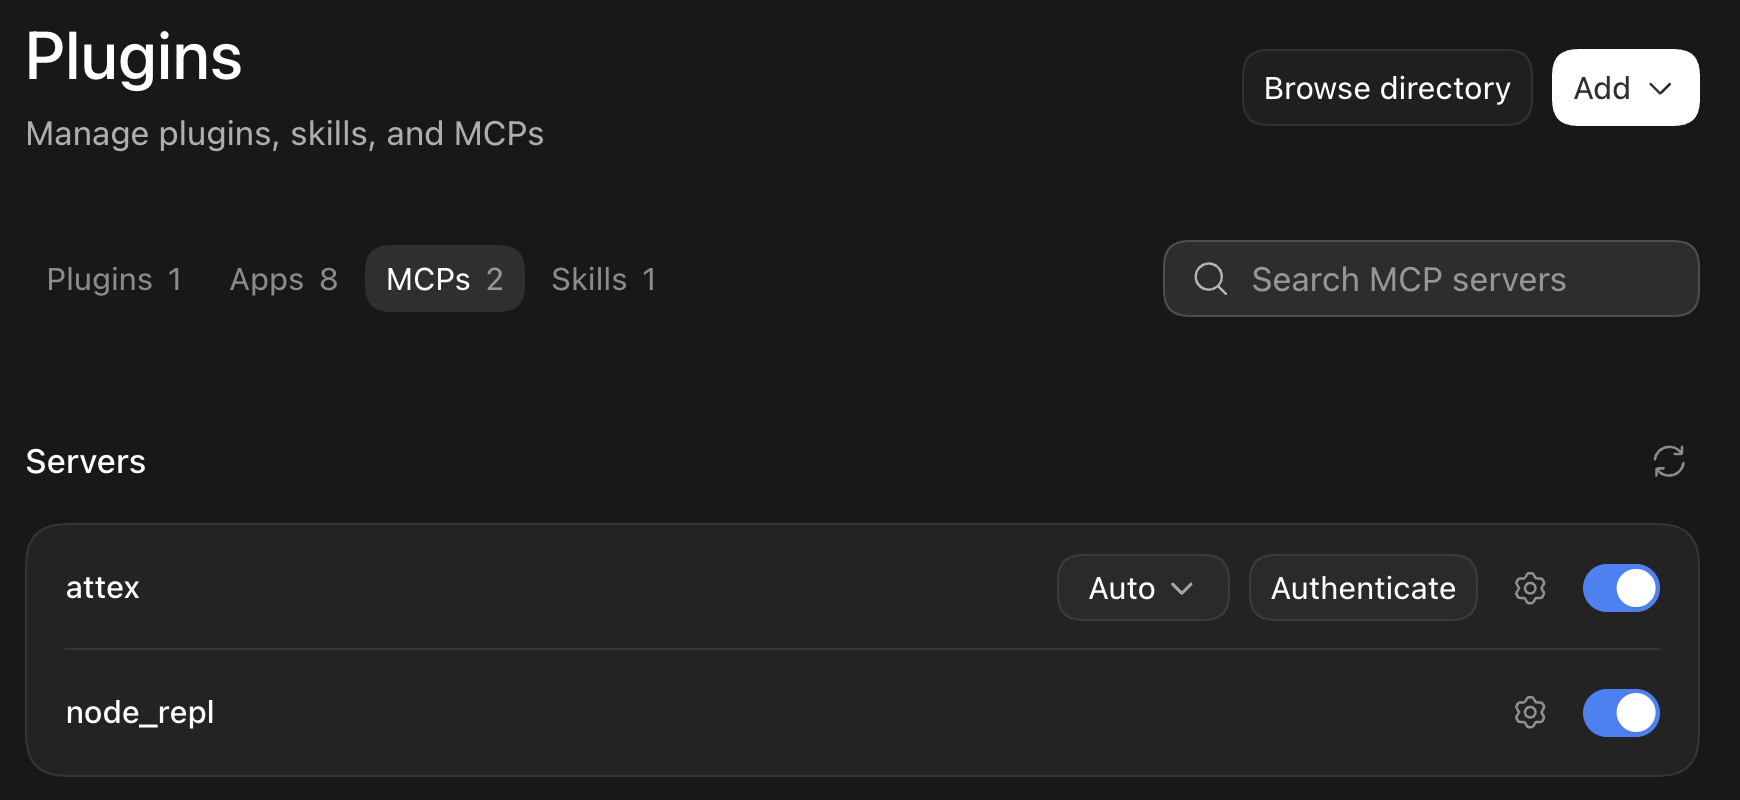
ATTEX is now listed as attex under Servers. Click Authenticate on its row: a browser tab opens for a moment, and when you are back the button is gone and ATTEX is connected.
Microsoft Copilot
ATTEX works in Cowork, the part of Microsoft 365 Copilot that carries out tasks for you. Your IT installs ATTEX once as a plugin for the people who use it; each of you then connects it the first time a task needs it and signs in with a code. You do not paste a connection address here.
You need a Microsoft 365 Copilot licence and Cowork switched on for you; your administrator turns it on with a Cowork spending policy. ATTEX is not available in Copilot's Chat tab, and plugins do not run in the Copilot mobile app.
For your IT administrator
-
Download the ATTEX plugin: attex-copilot-plugin.zip. It holds the manifest, two icons and the list of ATTEX's tools, and points Cowork at
https://mcp.attexdata.ai/mcp. -
In the Microsoft 365 admin center open Agents, All agents, Add agent and upload the zip.
-
Under Publish choose the people or group who use ATTEX. Under Install choose the same group, so ATTEX is already added for them. The default security policy fits, and ATTEX asks for no permissions. Click Publish.
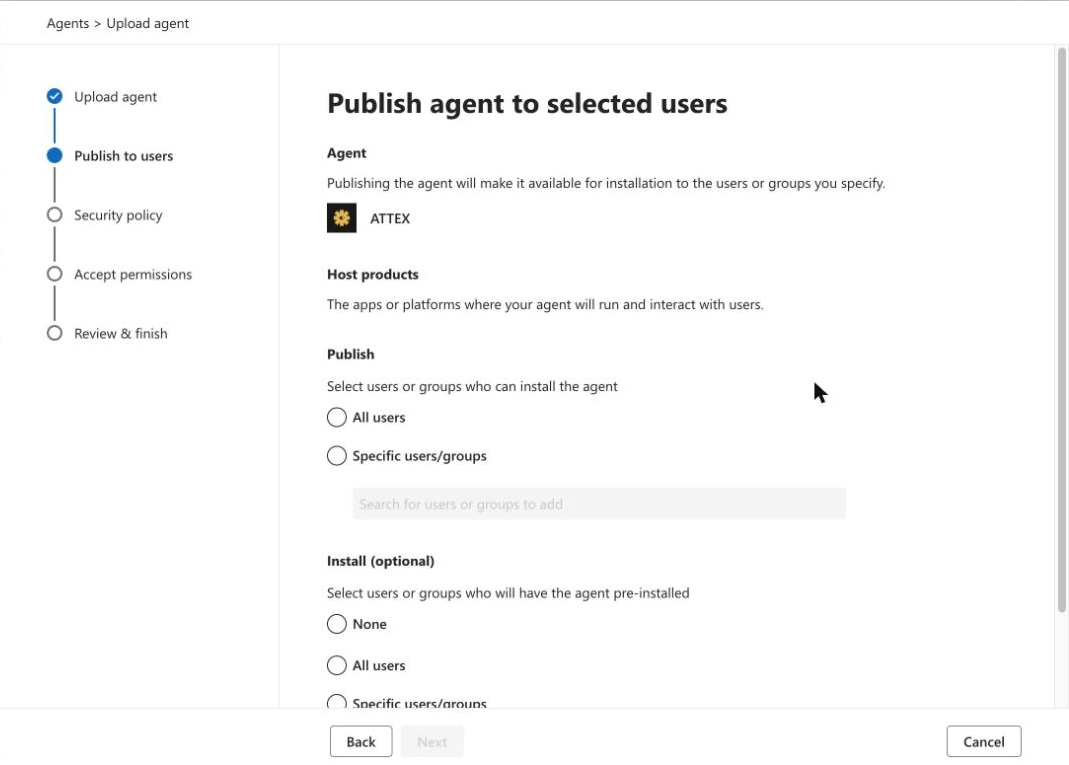
-
The upload takes about half a minute and ends with You uploaded ATTEX. It reaches the people you chose within a few hours at most.
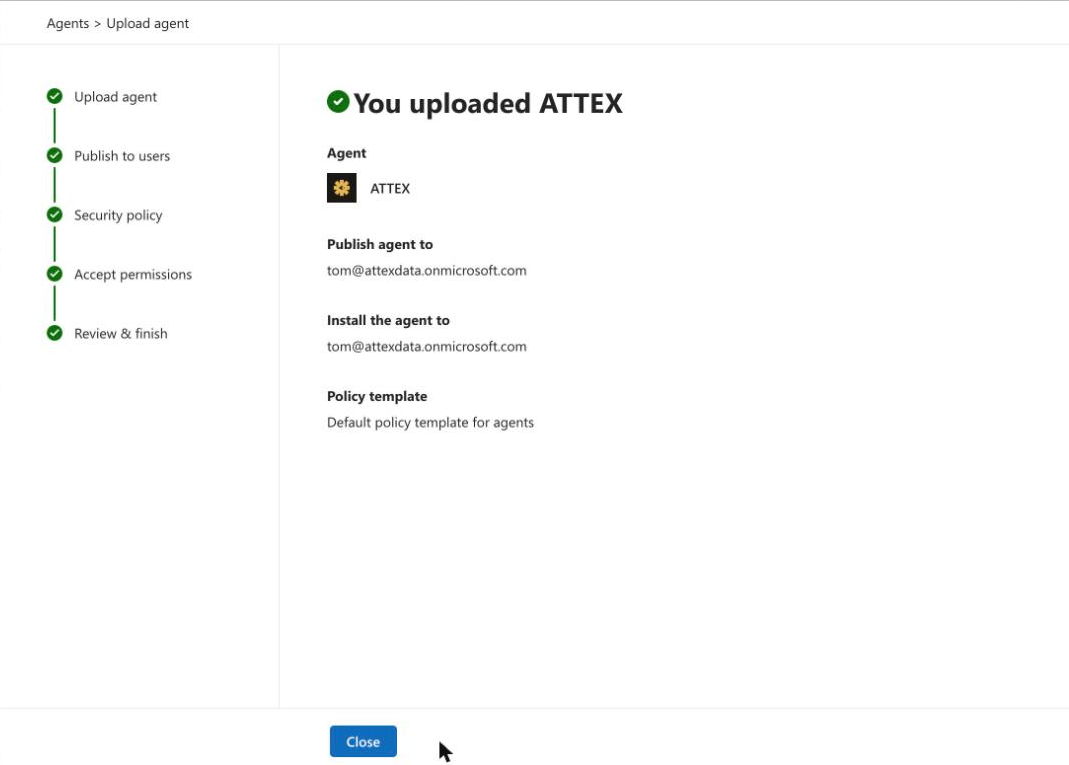
Nothing else needs setting up in Microsoft: ATTEX has its own sign-in, so there is no Entra app to register and no secret to enter. Cowork registers itself with ATTEX the first time someone connects, and each person signs in as themselves with the address ATTEX invited. ATTEX's tools only read aggregate numbers. To change who has it later, open ATTEX under All agents. Removing the plugin, or uploading it again as a new agent, ends everyone's connection: each person then connects and signs in once more.
For everyone else
-
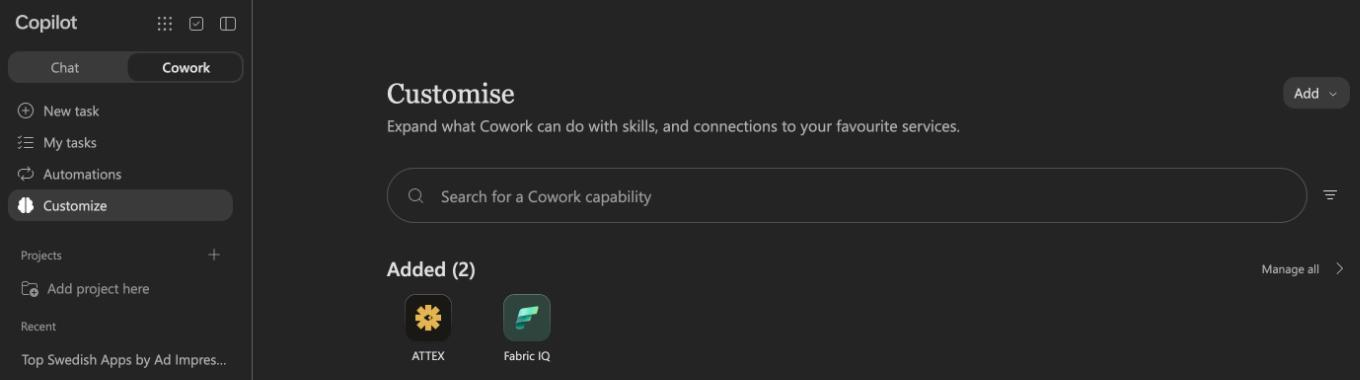
Open copilot.cloud.microsoft and choose Cowork at the top left, not Chat. ATTEX is listed under Customize, Added.
-
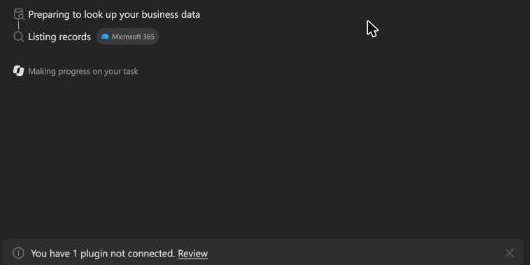
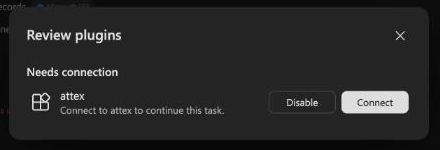
Start a task that names ATTEX, for example "Use ATTEX to show the top 10 apps by ad impressions in Sweden last month". The first time, Cowork stops and says You have 1 plugin not connected. Click Review, then Connect next to attex.
-
A sign-in window opens; sign in with the address ATTEX invited, as under Signing in with a code. The window closes when you are done. Ask your question again: Cowork does not resume the task it stopped.
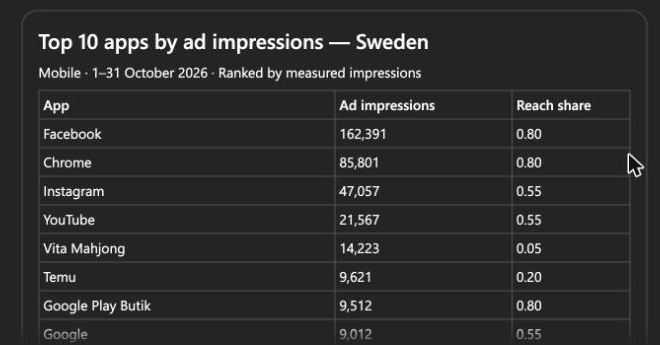
If your administrator has not installed ATTEX but your organisation lets you add plugins yourself, choose Customize, Add, Upload, pick the zip from the step above and keep Only you.
Copilot Studio
Teams without Cowork can add ATTEX to an agent they build in Copilot Studio, which comes with a Microsoft 365 Copilot or Power Platform licence or trial. In the agent's Tools page choose Add a tool, New tool, Model Context Protocol. Enter ATTEX as the server name, a one-line description ("ad attention measured on consumers' phones in the Nordics") and your connection address as the server URL. Choose OAuth 2.0 with Dynamic discovery, click Create, then Create new connection; a browser tab opens for a moment and comes straight back. Finish with Add and configure. If the agent later says it cannot reach ATTEX, open Connection manager and check that the connection shows Connected.
Asking your assistant to set it up
You can hand the invitation mail to your assistant and ask it to connect ATTEX. In Claude and ChatGPT an assistant cannot add a connection from inside a chat, so it tells you where to click: the steps are the ones above, and they take a minute. Claude Code and other assistants that run commands add it themselves with the command under Claude. In Microsoft Copilot there is nothing to hand over: ATTEX comes as a plugin your IT installs, and Copilot cannot add it from a task either.
If you are an AI assistant reading this page for someone: you cannot add a connector from inside a chat. Their connection address is the part of the invitation's link after #address=. Give the person the steps above for the assistant they are using, with that exact address. If they use Microsoft Copilot, there is no address: tell them to ask their IT administrator to install the ATTEX plugin, with the steps under Microsoft Copilot.
One connection for a whole organisation
On a Claude Team or Enterprise plan a connector is added for the whole organisation, and in many workspaces only an administrator can add one. There the administrator adds this shared address once, and each invited person then clicks Connect on ATTEX and signs in with a code.
Do not add a personal connection address to an organisation: everyone in it would see the connector and connect as you. While you wait for your administrator, a personal Claude or ChatGPT account works with your own address.
https://mcp.attexdata.ai/mcp- Claude Team and Enterprise: an Owner adds it under Organization settings, Connectors, Add, Custom. Every member then finds ATTEX under Customize, Connectors.
- ChatGPT Business and Enterprise: an administrator turns on Developer mode and adds it as a custom MCP server for the workspace.
- Microsoft 365 Copilot: the administrator installs the ATTEX plugin for the people who use it, as under Microsoft Copilot. Each of them then connects and signs in with a code.
Signing in with a code
A sign-in page opens when you connect through the shared address, or when your personal address is more than a week old. There is still no password.
-
The page names the assistant that asked. Enter the email address ATTEX invited and click Send me a code. The mail comes from
noreply@attexdata.aiwithin a minute; check spam the first time.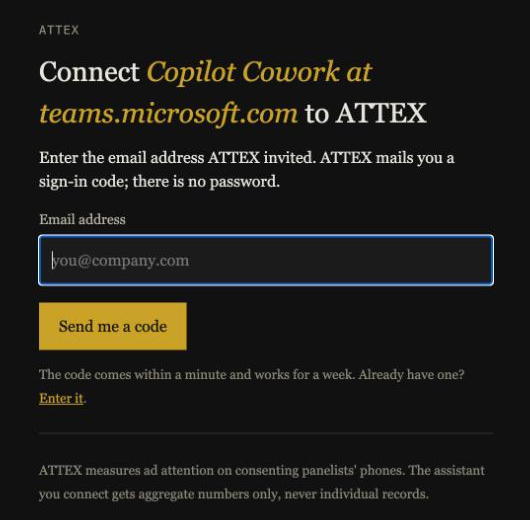
-
The page now asks for the code. Type it in and press Connect. You are back in the assistant, signed in.
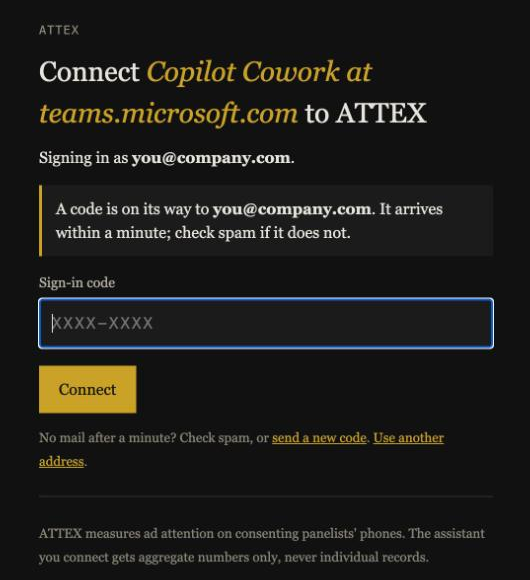
If you already have a code from the last week, choose Enter it on the first page instead of having a new one sent.
A code works for a week and more than once. If the page names an assistant or a website you did not just use, close it. Your assistant stays signed in for 30 days without asking again, and you can disconnect it in the assistant's settings at any time.
First questions
Ask your assistant to describe the ATTEX data first; it reads the definitions and your account's markets and dates. Then, for example:
- Which apps and sites carried the most ad impressions in Sweden in October, and how did attention differ between them?
- Which brands in retail got the longest attention time last month?
- Show the top creatives for Oddset by attention rate, with how far each reached.
- How do reels, stories and feed posts compare on Instagram for women aged 25 to 44?
- How many impressions and panelists per market per week since September?
Every rate and average comes with its margin of error, computed with the person as the unit, and every row with the share of the panel it reached; a wide margin is called an indication. Rows with fewer than five panelists are left out, so a total over a breakdown can be smaller than the plain total. Attention rates are fixated impressions over eye-tracked impressions: ask for the eye-tracked count when a rate looks surprising. Every answer carries a source line to put under the table or chart you present, and a run id that lets the number be traced later.
Limits
An account can run 300 questions a day. The data is the same as the export: mobile impressions in Sweden, Norway, Denmark and Finland, by day, hour, app, website, brand, industry, creative, ad format, age, gender and region. The last two days are still filling in.